Crochet Christmas Candle Cover Pattern
I picked up this dollar store jar candle that had a nice vanilla scent. I was looking at it while crocheting and thinking there's not much charm of the candle being in the glass. Instinctively, I grabbed my crochet hook and some thread yarn and made a cover for it. You can too by following the pattern below. This is the Crochet Christmas Candle Cover.

Materials Needed
- Jar Candle - 4" Diameter. Candle is 5.25" Tall. Cover made only goes 5" high on jar.
- Candle was purchased at a discount store for about $5 - $7.
- Bernat Handi Crafter Crochet Thread - Colour seen in picture is called "Adrift" by Bernat.
- Size 2.5 mm Crochet Hook or Size B in US Sizes
Definitions
CH - Chain, SC - Single Crochet, DC - Double Crochet, SL ST - Slip Stitch, BEG - Beginning
Free Pattern:
Starting at Base and Creating Bottom First
- CH 8, join wth SL ST to form ring.
- CH 3, 19 DC in ring. Join with SL ST to the top of BEG CH-3.
- *CH 4, skip next DC, SC in the next DC. Repeat again from * all the way around with SL ST at the end bottom of the first CH 4.
- *CH 5, SC in the CH-4 Space, repeat from * around to the end. Finish with a SL ST at the end of the bottom of the CH 5 spot.
- Ch1, then * 3 SC in the same spot as the CH 5 space, then chain 9. Repeat from * all the way around.
- Fasten off.
- Cast on in the middle of the CH 9 Space. 1 SC then * CH 9 and SC in the middle of the next CH 9 Space. Repeat from * all the way around. SL ST in the BEG cast on space.
- 12 SC in the CH 9 space. You will have to squeeze these in the space. *12 SC in the next CH 9. Repeat all the way around. SL ST in the starting SC.
- SL ST to the 6th SC, then * CH 15 and then SC to the next 6th SC of the next space. Repeat from * all the way around. (If you have a smaller ball, you will chain between 5 to 15. Less chains will make the lace thread tighter to the ball. Too tight and it will not stretch around the ball. I would suggest trying half and then try stretching it to see it it's going to work. Just use an educated guess to best determined the perfect fit.)
- Fasten off and wave in ends.
Begin Climbing Up Jar
- Fasten on at the 6th SC in the middle of one of the outside loops. *CH 9 and SC into the next 6th SC in the next space. Repeat from * all the way around. SL ST to where you fastened on.
- Begin 12 SC in the CH 9 space you created in the last line. Ensure you are not going into the stitches, but you are going around the entire chain so that the CH 9 row won't be seen. *When completed 12 SC in the first space, immediately 12 SC into the next space. Repeat from * all the way around. SL ST to the beginning fasten on spot that was created in the line before. Fasten off and weave in ends.
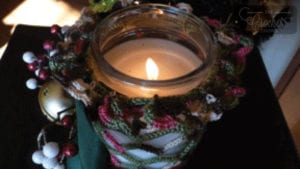
- If you are going to change colour, now is time to do so. You will notice the picture has two yarns working up through the side of the jar. A solid green and a variegated Christmas colour. You want to ensure when you chain that the SC that goes over the chain in the next row will cover it.
- Repeat Step 1 and 2 as many times as you need. The candle in the tutorial needs to be repeated 4 times to get the height. Keep in mind that that you don't want to be too generous as you want the mesh fish netting that you have created to stretch out to keep it's appeal.
Top of Jar
The top ridge of the cover needs to have a tighter contraction to prevent the cover from slipping down. The jar I purchased has a lip that narrows to the inside of the jar which is perfect for getting the cover to have something to hold onto. The finishing ribbon also tightened in the narrowed spot to provide non-slippage.
- Fasten on desired colour to the 6th SC in the middle of one of the outside loops. *CH 5 and then SC into the next CH 6th SC in the next space. Repeat from * all the way around. SL ST to where you fastened on.
- Begin *9 SC in the CH 5 space you created in the last line. Don't go into the stitches but go around the chain like before. Repeat from * all the way around and SL ST to where you fastened on.
- * CH 5 and then SC into the 5th SC of the line below. CH 5 and then SC into the middle of where the two loops before meet. Repeat from * all the way around. Until this point, you have been working with 10 loops on the outside of the jar. This row will then double up your loops to 20 which will create a frill affect.
- Begin 9 SC into the CH 5 Space, immediately jump to the next CH 5 space and put in 9 SC and repeat from * all the way around. SL ST to the final SC that you started with on this row.
- *CH 5 and then SC into the 5th SC of the line below. Ch 5 and then SC into the middle of where the loops meet. Repeat from * all the way around.
- Begin *9 SC into the first CH 5 Space, immediately 9 SC into the next CH 5 space and repeat from * all the way around
- Fasten off and weave in ends. Cover is complete.
Accessories & Final Look
 As depicted in pictures. There is a bell that is wired to the cover.
- Two pieces of Christmas Fake Arrangements were snipped from another project and inserted in begin the cover through a hole and fastened using wire into place.
- Green Ribbon was measured out by eye. The ribbon was inserted in and out of the upper mesh hole spots that you created to ensure it was holding the cover firm around the candle.
- Wrap up and give away to a someone you care about. Total cost of this project is under $10 and is pretty elegant if done right.
Nicole says
No Blue Button